FAQ – Frequently Asked Questions
Beginners
Of course, it is not possible to make a general statement about this. Let’s take a look at two examples:
Apartment approx. 65 to 110m²
9 light circles, of which one:
3 light circuits switchable, 6 light circuits dimmable
5 Roller shutters or venetian blinds
5 heating circuits
3 RGB circuits or 2 RGBW circuits
Cost of system equipment:
1.636€ incl. VAT
Costs for fully wired, tested and pre-programmed Smart-Home distributors:
3.719€ incl. VAT
Medium sized house approx. 110 to 150m²
15 Light circles, of it:
9 light circuits switchable, 3 light circuits dimmable
16 Roller shutters or venetian blinds
10 Heating circuits
3 RGB circuits or 2 RGBW circuits
Cost of system equipment:
2.837€ incl. VAT
Costs for fully wired, tested and pre-programmed Smart-Home distributors:
ca. 6.118€ incl. VAT.
Even after the installation of Comexio, the operation and control of roller shutters, blinds, lighting, etc. can be carried out as usual via push-buttons. Thus, there is no difference in operation compared to a conventional electrical installation.
You have various options to ensure operation in the individual rooms:
- Conventional switch e.g. from the DIY store or wholesale trade
- We do not recommend using switches.
- Conventional pushbutton e.g. from the DIY store or wholesale trade
- Soft- and hardware is designed for push buttons. Clear recommendation from Comexio.
- KNX button
- In advance, KNX buttons must be parameterised via the KNX software (ETS). Only then is integration into the Comexio system possible.
- Radio button (EnOcean)
- For this you additionally need the EnOcean unit.
After the first start-up the system works completely self-sufficient even without Internet. The only drawback: Remote access via smartphone, tablet or computer is not possible. In your home W-Lan network (Intranet), however, you can carry out all controls via smartphone, tablet or computer.
Comexio has developed into a stable player on the smart home market and is now indispensable. The central cabling recommended by Comexio is the best choice, especially when it comes to future-proofing. You can exchange the Comexio system for any other system.
You have a request and simply don’t know more? You can use the support ticket system to tell Comexio Support about your request. They will then get in touch with you.
You can create a support ticket via the following link
- central functions
- Lighting off, alarm on, reduce heating temperature, power circuits off
- Automated roller shutter control, central roller shutter controls
- Programmable time functions or sun position tracking
- Holiday simulation
- Economical, automated heating control
- Window contact, PI control, Presence
Software
Via the user administration you have the possibility to create different users with different rights. You can also create areas that your guests can access via their own smartphone. More information can be found in the manual under point 2.3 User administration.
The configuration of the IO-Server can only be downloaded with administrator access. You can find it in the Comexio Studio settings under -> Configuration -> Save configuration -> Download.
The IO server can only be reset to factory settings with administrator access. This can be found in the Comexio Studio settings under -> Configuration -> Key combination CTRL + G -> Reset device.
Attention! Please save your configuration before you reset the IO Server to factory settings, otherwise it will be lost. The IP address is also reset to the default IP (192.168.1.254).
You can only restart the IO-Server with administrator access from the software. This can be found in the settings in Comexio Studio under -> System Info -> Key combination CTRL + G -> Restart
IO-Server / IO-Extension
Check the slide switches of the bus termination. More information can be found in the manual under point 2.8.1 General.
The slide switch on the first and last device must be pushed to the left. The slide switch on the other units must be pushed to the right.
Have you connected the counter potential to terminal N/-? If you use 24V, you have to connect the 0V of the power supply to the terminal N/-. If 230V is used, the neutral must be connected to this terminal (N).
Use the same power supply for the assignment of the analog inputs as for the Comexio system devices. If you use a different power supply, you must connect the 0V of the two power supplies to each other.
The outputs (e.g. the lighting) are permanently ON or OFF and no longer react to switching commands.
The relay contacts of Comexio system devices can be damaged or in the worst case even destroyed by loads (e.g. LED´s or switching power supplies) which cause extremely high inrush currents. To prevent this, please use suitable inrush current limiters or connect the loads via additional relays.
If the relay is already damaged, please contact Comexio support via the support ticket.
The IO server may not be in the correct subnetwork. This means that you must adapt the IP address of the IO server to the IP address of the router or the existing network.
https://www.comexio.com/tutorial-zugriff-auf-den-io-server/
Please check the DHCP settings in your router or server or contact the responsible system administrator.
Depending on the cable length and the number of sensors, a pull-up resistor is required. More information can be found in the manual 3.6.1 1-Wire Basics).
In addition, check the terminal connections on the IO Server and all other external terminal connections.
Tighten the screws of the terminal and measure the terminal +5V against 0V and the terminal 1 against 0V of the supplying power supply in the unloaded state (nothing connected). In both cases you should measure a voltage of 5V.
If the 1-wire bus suddenly stops working, it is possible that a sensor is defective and blocks the entire bus. Disconnect the bus and put sensor by sensor back into operation.
Attention! Please never pull the Power | EXT terminal during 1-Wire operation. This can damage several sensors or, in the worst case, the 1-Wire interface on the IO server.
Depending on the wiring topology, you can integrate up to 32 1-wire sensors on one IO server. More information can be found in the manual under point 3.6.1 1-Wire Basics.
You can increase the number of 1-Wire sensors via additional IO servers. For this a network connection between the IO servers must exist. The temperature values must then be transferred from one IO server to the other via WebIO. More information can be found in the manual under 7.2 WebIO.
To reset the IP address of the IO Server, press and hold the button below the flashing LED on the IO Server until you see a change in the LED.
You can then release the button. Now the IP address has been reset to the default address 192.168.1.254.
Universal-Dimmer
Check whether the outer conductor and the neutral conductor are connected. Depending on this, it is also possible that the light source cannot be switched on because an incorrect dimming procedure has been selected. (Manual 2.8.5 Universal dimmer)
Please check the necessary dimming procedure for your illuminant. If it concerns small consumers (illuminant <20W), the suitable dimming procedure + small consumer must be selected. (Manual 2.8.5 Universal dimmer)
If you connect a non-dimmable load to a dimming output, e.g. a ballast unit, this generates high voltage and current peaks when it is switched off, which can cause all outputs to switch off.
A load must be connected so that the output remains switched on. If you have connected an illuminant and the output still switches off, please select the appropriate dimming method + small consumer.
IP-Raumcontroller
- Please check the network connection of the IP room controller.
- The assignment of the LSA ring is connected according to EIA/TIA 568A.
- To check whether the connection has been made correctly, the green LED in the lower part must light up and the orange LED must flash.
- The power supply of the IP room controller is provided via POU. Please use a suitable power supply unit or a POU switch to operate the IP room controller.
- Please check whether the room controller is in the same network as the IO server.
To reset the IP address of the IP room controller, drag the display of the room controller from the lower part. Now we assume that the brightness sensor and motion detector are at the top (circular) and the loudspeaker and microphone are at the bottom (slots).
Before reinserting the display, press and hold the two buttons on the left side while reinserting the display. Keep both buttons pressed at all times. Now the LED´s of the individual keys should light up red. From this point on, press one of the right-hand keys until the LED´s keys of the individual keys turn green. Now the IP address of the IP room controller is reset.
Other
You have followed our tutorial and your remote access does not work?
https://www.comexio.com/tutorial-fernzugriff
Since we currently offer our free remote access only for one public IPv4 address, the provider may provide you with an IPv6 address. In this case you have to contact the provider and apply for a public IPv4 address.
The latest firmware is available at the following link
https://www.comexio.com/firmware-download
Before you update the system, you should always download and save the configuration. How this works can be found in the FAQ “I need the configuration, where can I download it” under “Software”.
We recommend that you bring your system up to date under the following conditions
- A bug has been fixed that prevents you from executing a specific function
More information about fixed bugs can be found in the changelog under the following link
https://www.comexio.com/firmware-download/
You discovered a bug? Please report it under the following link
- You have a request and are about to contact Comexio Support via the Support Ticket System?
Please update your system to the latest version and check whether this has solved your problem.
- The new software contains a new feature, which you absolutely want to use
If the above reasons do not apply, there is no reason to update the system.
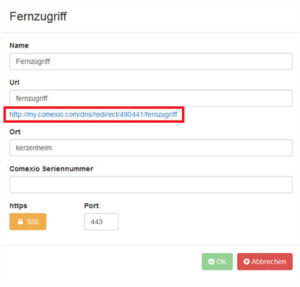
As soon as you have set up remote access, you must enter the link with a red border in the app under “Global address”. You will find the link in the Comexio planner.
https://shop.comexio.com/customer/account/login/